I Present To You
You can also play lone wolf, but that’s more dangerous and you will probably have to hide/run a lot. The third way is to try to get into an existing faction. This most likely won’t work unless you are known to be a good PvP player and post your inventory on the subreddit after you’ve mined a lot. Please don’t spam the ingame chat asking for a faction to join. The Shotbow Network has a dedicated sub-forum for that.
In this tutorial, we’ll focus on starting a new faction.
Don’t ask if you can join any existing faction. No faction will recruit you if they don’t know you and you just started. Recruiting a player is a huge risk for a faction as single malicious player can make a faction raidable.
At Spawn
The Spawn is the pre-built area around x=0, z=0. It’s around 80 blocks in all directions. The borders of spawn are usually marked by colored wool. Inside the spawn, you cannot be killed, die from hunger, drown and you don’t take fall damage. You can sell ores for in-game money and buy other items using in-game money at the spawn shop (more on that later).
After you (re)spawn, you are protected from PvP (Player versus Player) for one hour. This protection will help you build your first base. The PvP protection only protects you from other players and prevents you from entering land owned by other factions. Once you exit spawn, you can be killed by mobs, falling, lava, drowning and, since the server is on hard mode, hunger.
Be careful to never disconnect or log out outside spawn when other players are nearby. This will turn you into a combat logger (more on that later) and you can be killed even while being offline and PvP protected. Only log out using the /logout command or if you are sure there are no other players around.
Stay at the spawn and find the free starter kit sign.
Map 14 had two such signs near the spawn at 0,0.
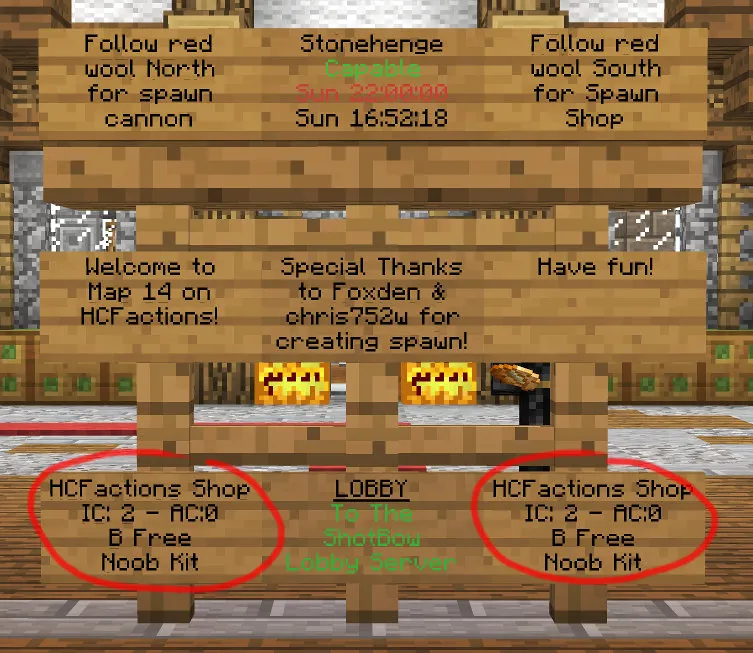
Left click the sign to receive a fishing rod and a faction claiming stick. Use it to get at least 10 fishes in one of the lakes at spawn. Remember you can die from hunger. The first fishes will help you survive the next hour.
Catch a sufficient amount of fish (we recommend 10) or you’ll starve within 10 minutes!
Once you’re done, log out till it’s daytime. Why? You only have one hour of PvP protection. Since you can still be killed by hostile mobs outside of spawn, it’s better to only leave spawn during daytime. Logging out does not waste your precious PvP protection time.
While you’re logged out, use the map on http://hcfactions.net/map/ to find a good spot for your base. Look at this picture:
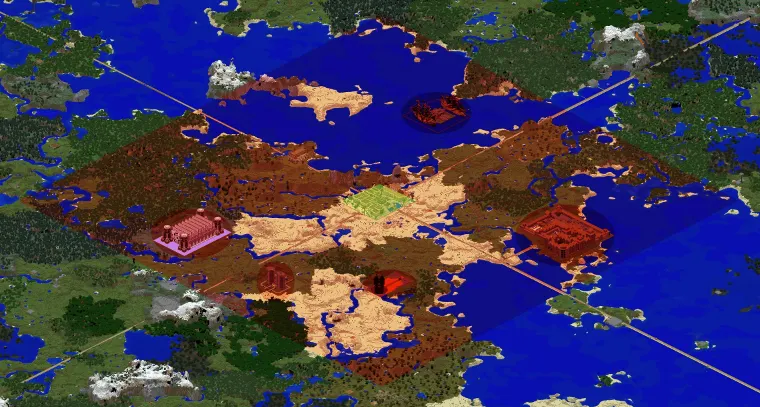
Each map usually looks like this around spawn: The green area in the center is the Spawn at x=0, z=0. You cannot build here and will take damage if you try to break blocks! Outside the spawn is the Warzone (orange area). It usually stretches out for 750 blocks from the map’s center into each direction. Inside this area, you can break and place blocks, but you cannot protect your building. So don’t build anything here!
The red areas inside the Warzone are the “King of the Hill” (KoTH) and Palace areas. These are special event areas. You cannot build or break blocks there and trying to do that will hurt you.
Most HCFactions maps contain four roads (yellow in the picture) leading to all four cardinal directions of the map. These roads allow easy travel out of the spawn and the warzone. Which leads us to the final area of the map: The Wilderness. It starts outside the Warzone and ends at the edge of the map (usually around 3500 blocks in diameter from Spawn).
The Wilderness is the large part of the map where you can claim land. Doing so will protect your base from griefing and other things (more on that later).
Now back to starting your first base. Depending on what you’re up to, look out for trees( tools and charcoal), swamps (slimeballs) and sand (to craft glass). You should also search for other factions (Use the “Markers” tool at the top right corner of the map). As a beginner, don’t build near other major factions! It’s too dangerous. Also don’t build near the four major roads, because you might encounter other potentially dangerous travellers. Stay clear of the event areas (King of the Hill and Palace). Good PvP players will otherwise walk by your base while going to them, which is probably dangerous too.
It’s more safe the farther you are from the Spawn. The only way to get back to the spawn is walking (or riding on pigs/horses). Since you have to get back to the Spawn repeatedly to sell ores, being far away is a slight disadvantage.
Find a sweet spot between too dangerous and too far away
Leaving spawn
So it’s daytime again. If you play alone, you may choose between the spawn cannon (which will teleport you to a random location within the Warzone) or walking. If you play as a group, walking is the only option to stay together. We’ll focus on the latter option. Pick a road and start walking past the spawn’s border. Remember, you can now be killed by mobs, drown, fall or die from hunger! The first thing you should do is craft a wooden pickaxe, get some cobblestones and craft a stone sword. This helps you in case you have to defend against hostile mobs. Also destroy grass and collect the seeds for your first wheat farm. Next get some more wood and collect saplings (and if possible the apples - more food!). Other optional things to take with you if you find them: sugar canes (for books and brewing), mushrooms (brewing), cobble (furnace) and coal (torches plus smelting).
Keep an eye on your remaining PvP protection time (use /pvp time regularly).
Head to the spot you intend to build your base on. Be careful not to fall into ravines or other deep holes.
Build a miniature shelter from anything you collected on your way. Use the correct size (see below) and shape. If you did not collect enough dirt, wood, cooble or any other solid material, dig down (not straight down!) and close off the top.
Claiming
Once you’re there, you first have to create the faction and claim land, so everything you build is protected from other players. First do /f create {factionname} (substitute {factionname} with your preferred faction name). This will create the faction and put your player’s 100$ in-game money into the faction account. Your faction now owns 100$ which you can spend to claim land. To do so, craft a stick. With this stick, hit the two corners of the land you want to claim while not crouching. Since you only have 100$, you can only buy a small piece of land. There’s also a tutorial with more information on claiming.
The claiming cost can be calculated like this: The first 250 blocks cost 0.4$ each, then 0.8$ per block for the next 250 blocks, 1.2$ for the following 250 and so on. As you see, claiming gets more expensive the more land you want to claim. If you start a second claim, it costs 500$ plus the cost for the blocks. The third claim costs 1000$ and so on. More information on claiming costs is available on the forum. You can also use our claiming cost calculator:
Claiming your claim with a size of x will cost you 90$.
With your 100$, you can claim a 15x15 area. Do this now. Once you hit the second corner of your land with a stick, the game will tell you the claiming cost and ask you for the name of the claim. Just type the name into the chat. Use “base” for example.
Next, use the stick and left-click into the air (without hitting any block). You should see pillars made of glass. These show you the corners of your land. Use them to make sure you built your base within your claim. Left click with a stick into the air to get rid of them. If you don’t have a stick, you can also use /f map to toggle those pillars.
If you are playing as a group, now might be a good time to invite your friends into your faction.
Inside your claim, other players cannot build or break blocks. But they can interact with these blocks, so be careful when you use them:
You can unclaim land. If you do that, the block costs (that is all except the costs for starting the claim, e.g. 500$ for the second claim) will be refunded into the faction account. If you disband your faction, all the claiming costs and the faction bank will end up in the leaders private account.
Building your first base
Look at this exemplary side-view of your claim:
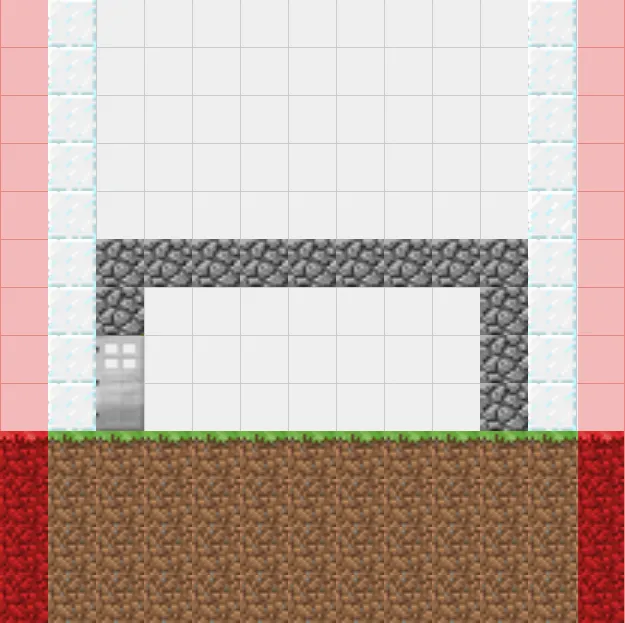
The red area is the area outside your claim; other players can place and remove blocks there. The glass pillars show the border of your claim. Unless you know what you’re doing, build your walls at least one block away from the border of your claim. This prevents other players from interacting with – for example – your doors! Never build any redstone sensitive block close to your walls. Look at this picture:
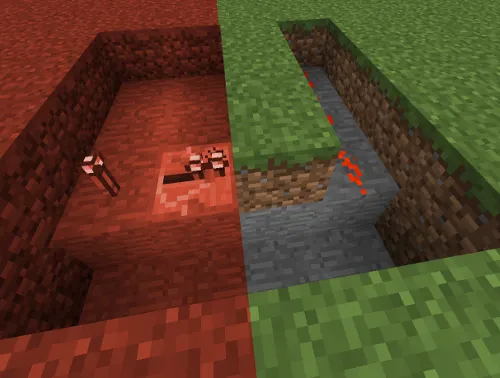
The red area is outside your claimed land. See the redstone wire 2 blocks inside your claim? It’s powered by the repeater and redstone torch any player could place outside your claim.
Always build redstone sensitive blocks at least 2 blocks away from the edge of your claim.
Here is another thing to avoid as it will get you killed. Be careful how much you dig out underground. Here’s a picture:
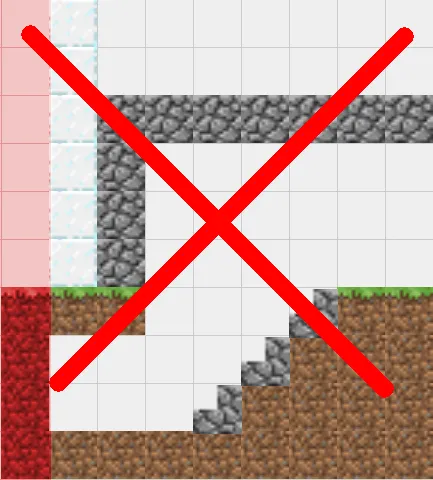
See the staircase going under ground? The small tunnel was build one block too far. Now the wall (in red on the picture) is outside your base! So any player can remove the dirt block that’s your wall. Once players see your base, some of them will dig down to search for these holes. Be careful! How to prevent this? Look at this picture:
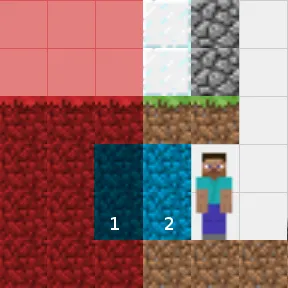
Not sure if the wall next to you is safe? Do a wall check like this: Carefully check if enemy players are nearby. Then dig out the 4 blue blocks. Now walk into your small hole. When you enter the outer block - the position marked as 1 in the picture - you should see a message like this in your chat: “Exiting {your faction name}” “Entering Wilderness”. Now walk back to position 2. You should see another message: “Exiting Wilderness”, “Entering {your faction name}”. This means that position 2 is already inside your claimed land and your walls were safe. Put the blocks back inside the blue area and enjoy the safe base.
Hint: Turn on the debug screen (Press F3) to see the coordinates. Walk into two opposing safe corners and write down the coordinates. Check against those when digging.
Nether and build a portal at the coordinates for your base (x and z divided by 8). When they enter the portal, Minecraft checks if there already is a portal in the overworld. If no portal is nearby, it will create a new one. This portal might be created right inside your base!
Always build a Nether portal, even if you don’t intend to use it yet.
To prevent this, you have to build a Nether portal. Search for diamonds (best level for that is around y=11). Build a diamond pickaxe and mine obsidian. Then build a Nether portal inside your base in a room that can be closed (to prevent zombie pigmen and enemy players from entering your base). Be sure to leave empty an space of 2x3 air blocks on both sides of the portal. If you build anything there, it will be destroyed by the first player entering your side of the portal. This is a special portal behaviour on hcfactions that prevents players from building portals that trap other players. See the thread on the forum for more details.
If you don’t find diamonds, you can also create a portal using only buckets and lava/water..
[paste:font size="5"]Mining
HCF provides temporary player classes which enable special abilities. To activate classes on this server, you have to wear certain armor. The most useful class at the beginning is the Miner Class. It provides you with Haste II and Night vision. To activate the Miner Class, craft yourself a set of unenchanted iron armor and put it on. You should see a message in chat that says “Miner Class activated in 60s”. Wait 60 seconds and you’ll get the effects associated with the Miner Class. The Miner Class makes it easier to mine, since you don’t need torches and you break blocks slightly faster.
The Miner Class also enables Zuergner mining (named after the player that made this mining technique public): If you have an Efficiency 5 pickaxe, you’ll melt through stone like butter. But more on that later.
Be careful about mineshafts. The cavespiders that spawn there are very dangerous. The server is in Hard Mode, so they will poison you. Consider carrying a Milk Bucket with you, so you can remove the poison effect.
Getting back to spawn and making money
Once you mined enough ores, it’s time to sell them at the spawn. It’s called a Spawn Run. You have to walk back to spawn. The spawn is always at x=0, z=0. There are several ways to get there, although only the first one is available for beginning factions:
Overworld
Walk to x=0, z=0. Be sure to take enough food with you, so you don’t starve on your way to spawn. Don’t forget the items you want to sell. Only leave at daytime, otherwise you’ll have to fight with mobs. If you have good armor at this point, you can also leave at night, since this provides some protection from enemy players. Be careful not to walk right by major factions. Don’t walk too close to the event areas (King of the Hill and Palace) if an event is currently running (use /koth time to find out). Have some tools and blocks with you so you can dig if necessary. Once you’re near spawn, run in. If other players attack you, don’t fight back, as this will “combat tag” you and will prevent you from entering spawn for 60 seconds (Note that a thorns armor will count as fighting back, so don’t wear one when doing spawn runs).
If you already have a brewing stand, consider using Invisibility. To be fully invisible, you cannot wear any armor or have any item selected. While players should not be able to see you (except for some barely visible particles), be even more careful about hostile mobs!
Nether
You can also reach the spawn using the Nether. The distance is divided by 8, so the walking distance is a lot smaller, but probably more dangerous. Be careful about Zombie Pigmen. It is possible that other players made them aggro and they attack you. This happens a lot, so watch out!
The Exit portal in the Nether (that leads right into spawn) is located somewhere around x=0, z=0 in the Nether. There’s also a safe zone around the exit portal, where mobs and other players cannot hurt you. Be sure to bring enough building blocks with you so you can build bridges or stairs if necessary. Gravel is very helpful when descending into deep pits. Also bring some extra tools with you, as you might have to dig a lot.
The End
If you live near an End portal (or even have your own (more on that later)), you can use the End. It’s the quickest way back to spawn.
Don’t go into the end without proper armor. Players might camp there waiting for you.
Selling and transferring money
At spawn, there’s the Spawn Shop somewhere. There are signs on the wall which you can hit with the left mouse button. This will sell the ores in your inventory and put the money in your personal account. Use /econ to check how much money you have. You should never walk around with money in your pocket, a player which kills you gets your money. And it’s lost when you die to mobs.
Always transfer money you have on you to your faction bank account. Check /econ to see the amount of money you have, then do /f m d {amount} to transfer it to the faction. Use /f show to see the faction balance.
Always transfer money to your faction. Otherwise it’s lost when you die to players or mobs.
Once you sold your ores, it’s time to get back home. Use /f home for that. You’ll be back at your base (remember that costs 50$).
Prices for selling
single stack stack of blocks
Redstone $1 $64 $576
Lapis Lazuli $2 $128 $1152
Emerald $5 $320 $2880
Iron $5 $320 $2880
Gold $10 $640 $5760
Diamond $50 $3200 $28800
Sponge $1000 $64000
Prices for purchasing
Some of the items might not be available yet. Ask in chat before you go to spawn to buy them.
16 Stone Slabs $50
16 Moss Stone $50
16 Cracked Stone $50
16 Circle Stone $50
16 Moss Cobble $50
16 End Stones $100
Chain Armor $400
Mycelium $500
Book and Quill $10
Redstone Lamp $10
Slimeball $25
Villager Egg $500
Blaze Rod $750
Netherwart $1500
End Portal Piece (you need 12 for a full portal) $15000
Crowbar1 $50000
Source: 1, 2, 3, 4, 5, 6, 7
Custom Item Recipes
There are 3 custom crafting recipes you can use:
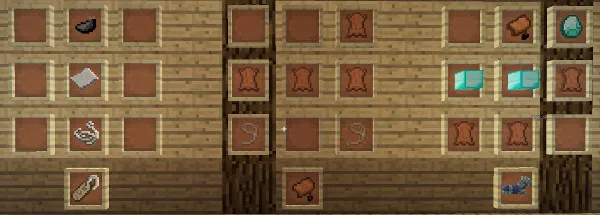
Expanding your base
To be done…
Efficiency 5 mining
If you have an enchantment table, work towards getting a Efficiency 5, Unbreaking 3 pickaxe. The easiest way is to combine a Efficiency 4, Unbreaking 3 pickaxe with another Efficiency 4 pickaxe on an anvil. Be sure to rename your pickaxe, otherwise repairing it will cost 2 additional levels each time up to the the point where it’s no longer possible.
With your new pickaxe, use the Miner Class, go down to y=11 and start mining like crazy. Strip mining will be boring after you’ve tried this once
See this video for more information on this technique. Be sure to also enchant a Fortune 3 pickaxe, so you can get more experience and ores while mining. It’s up to you if you carry a Silk Touch pickaxe with you (and use the Fortune pickaxe at home) or use the Fortune pickaxe while mining.
Use the Minecraft Enchantment Calculator to find the best level to enchant your items.
Moving a spawner
You can buy a crowbar for ????$ at the Spawn Shop. It will allow you to pick up a spawner once. Use it wisely.
Do NOT use the crowbar to farm. It will decrease its durability making it impossible to pick up spawners!
You should always have one spawner to grind XP you can then spend on books or other enchantments.
Enchanting and XP
The server removes some enchantments available in vanilla minecraft and caps others to certain levels (see details on hcfactions.net). This creates a more balanced PvP. There is also an XP modifier active, so you get 3x the amount of XP for everything you do.
Unlike vanilla minecraft, you can remove the enchantment from books by hitting an Enchantment Table repeatedly. So don’t collect your Bane of Arthropods books
You can save levels in bottles of enchantments by clicking on a enchantment table with an empty bottle. Use it to store experience that you cannot use now or might use in the future in times when mob spawning or other sources of xp are disabled - for example during Palace or EOTW.
Placing an end portal
If you have 12 end portal pieces, place them while standing in the middle. Also put in the eye of ender from a position that’s located towards the center of the portal. If you fail to do this, your portal might not light up. Contact the admins if that happens.
Protecting against cheaters
Try to build walls 2 blocks wide. This might help against players that try to v-clip/h-clip into the base. Piston doors might help also because iron/wood doors can be easily clipped through. Sadly this happened a lot in recent maps. So if your near spawn, be prepared to face cheaters.
So don’t afk inside the base. You might not be as safe as you think you are. Contact the admins (Use the modmail link in the right bar on the subreddit) if cheating happens.
Betraying
Don’t do it. Seriously. It’s probably not worth it. You reputation will suffer. All players will remember that you betrayed and you’ll most likely never get a spot in any good faction again.
Fighting
Click and jump the other player until one of you dies. Good luck.
Well. Not really. There’s a lot more to it. Since this tutorial was written by fluffy, a peaceful faction, this is everything we can say about fighting technique. Be sure to check out videos on youtube and follow the [subreddit][subreddit], where players sometimes provide insights on how to fight.
Don’t even try to fight diamond players without proper equipment. You’ll die in 5 seconds. Run and hide!
Classes
See the description on the website for more information on classes. Here is a small summary:
Archer
The archer class is activated by using leather armor. It enables speed and also modifies that damage done by arrow hits. The damage is multiplied depending on the distance of the target. A hit from 50 blocks will deal five times the damage. The vertical distance is not relevant. Only the horizontal distance is used for the damage calculation.
Rogue
Rouge is activated by using chain armor (you can get these from skeleton spawners or maybe at Spawn). Rouge can use golden swords to try to backstab diamond players. These backstabs will deal great damage. Rouge also gets a high speed buff, which might make it easier do to spawn runs, since it can outrun other players.
Bard
A set of golden armor enables the bard class. The bard is a support class that can provided buffs to near players of the faction.
Combat Tagging
If you attack other players, you’ll be combat tagged. This prevents you from entering safe zones for 60 seconds.
Combat Logging
You cannot escape fights by closing your Minecraft client. Disconnecting from the server while close to an enemy player will create a combat logger for 30 (???) seconds. A combat logger looks like a pigman with the player’s name. If you kill the logger, the player dies.
Be careful. There’s an unresolved bug in the combat logger code: If two players (maybe of the same faction?) combat log at the same time, the combat loggers attack each other.
Enderpearls
Enderpearls have a cooldown time of 15 seconds. So you have to wait between consecutive usage.
Dying
If you die, several things happen:
Getting back
If you respawn (either by buying XP and converting them to lifes, getting donated a life or waiting till the deathban expired), you’ll be in the safe zone of the dimension you’ve died in.
Subclaims
See our Permissions Tutorial.
Permissions
See our Permissions Tutorial.
Events (King of the Hill, Palace, etc.)
Check out this (old) article.
KOTH
Basically stand in a certain area (cap zone) at a certain location for 20 minutes to win the KOTH (King of the Hill). While KOTH is running the area around the capzone has a reduced deathban of 15 minutes. So it’s not too dangerous to die there. Be aware that when you win KOTH deathban returns to the full scaling deathban an you might be banned up to three days if you die.
Mini KOTH
Basically like KOTH but with reduced loot. They don’t have a fixed location and spawn randomly (outside of faction claims) on the map. The location is announced in chat.
Evil Tower
You enter a tower and have to fight your way against mobs (and potentially other players) through 13 floors. At the top of the tower are loot chests and an end portal exit. Do /f who EvilTower to find out where Evil Tower is on the current map (if at all).
Mob damage multiplied, so mobs do a lot of damage. It’s recommended to go as a (small) team. Team size should be below DTR of course. Don’t become raidable doing Evil Tower!
Evil Mine
PvE Zone where you can fetch loot from chests.
EGG
Extreme Grass Growing is a minigame which is available as spawn from time to time. 16 Players in a glass cube wait for grass to grow to their spot. The winner gets items (some unobtainable by other means, like admin heads). The entrance is in the water below the east bridge inside Spawn. Remember to not wear leggings while playing EGG
End of the World (EOTW)
The last big fight before the map ends. There’s a capzone at spawn that has to be captured for 30 minutes.
Random Tricks
In this tutorial, we’ll focus on starting a new faction.
Don’t ask if you can join any existing faction. No faction will recruit you if they don’t know you and you just started. Recruiting a player is a huge risk for a faction as single malicious player can make a faction raidable.
At Spawn
The Spawn is the pre-built area around x=0, z=0. It’s around 80 blocks in all directions. The borders of spawn are usually marked by colored wool. Inside the spawn, you cannot be killed, die from hunger, drown and you don’t take fall damage. You can sell ores for in-game money and buy other items using in-game money at the spawn shop (more on that later).
After you (re)spawn, you are protected from PvP (Player versus Player) for one hour. This protection will help you build your first base. The PvP protection only protects you from other players and prevents you from entering land owned by other factions. Once you exit spawn, you can be killed by mobs, falling, lava, drowning and, since the server is on hard mode, hunger.
Be careful to never disconnect or log out outside spawn when other players are nearby. This will turn you into a combat logger (more on that later) and you can be killed even while being offline and PvP protected. Only log out using the /logout command or if you are sure there are no other players around.
Stay at the spawn and find the free starter kit sign.
Map 14 had two such signs near the spawn at 0,0.
Left click the sign to receive a fishing rod and a faction claiming stick. Use it to get at least 10 fishes in one of the lakes at spawn. Remember you can die from hunger. The first fishes will help you survive the next hour.
Catch a sufficient amount of fish (we recommend 10) or you’ll starve within 10 minutes!
Once you’re done, log out till it’s daytime. Why? You only have one hour of PvP protection. Since you can still be killed by hostile mobs outside of spawn, it’s better to only leave spawn during daytime. Logging out does not waste your precious PvP protection time.
While you’re logged out, use the map on http://hcfactions.net/map/ to find a good spot for your base. Look at this picture:
Each map usually looks like this around spawn: The green area in the center is the Spawn at x=0, z=0. You cannot build here and will take damage if you try to break blocks! Outside the spawn is the Warzone (orange area). It usually stretches out for 750 blocks from the map’s center into each direction. Inside this area, you can break and place blocks, but you cannot protect your building. So don’t build anything here!
The red areas inside the Warzone are the “King of the Hill” (KoTH) and Palace areas. These are special event areas. You cannot build or break blocks there and trying to do that will hurt you.
Most HCFactions maps contain four roads (yellow in the picture) leading to all four cardinal directions of the map. These roads allow easy travel out of the spawn and the warzone. Which leads us to the final area of the map: The Wilderness. It starts outside the Warzone and ends at the edge of the map (usually around 3500 blocks in diameter from Spawn).
The Wilderness is the large part of the map where you can claim land. Doing so will protect your base from griefing and other things (more on that later).
Now back to starting your first base. Depending on what you’re up to, look out for trees( tools and charcoal), swamps (slimeballs) and sand (to craft glass). You should also search for other factions (Use the “Markers” tool at the top right corner of the map). As a beginner, don’t build near other major factions! It’s too dangerous. Also don’t build near the four major roads, because you might encounter other potentially dangerous travellers. Stay clear of the event areas (King of the Hill and Palace). Good PvP players will otherwise walk by your base while going to them, which is probably dangerous too.
It’s more safe the farther you are from the Spawn. The only way to get back to the spawn is walking (or riding on pigs/horses). Since you have to get back to the Spawn repeatedly to sell ores, being far away is a slight disadvantage.
Find a sweet spot between too dangerous and too far away
Leaving spawn
So it’s daytime again. If you play alone, you may choose between the spawn cannon (which will teleport you to a random location within the Warzone) or walking. If you play as a group, walking is the only option to stay together. We’ll focus on the latter option. Pick a road and start walking past the spawn’s border. Remember, you can now be killed by mobs, drown, fall or die from hunger! The first thing you should do is craft a wooden pickaxe, get some cobblestones and craft a stone sword. This helps you in case you have to defend against hostile mobs. Also destroy grass and collect the seeds for your first wheat farm. Next get some more wood and collect saplings (and if possible the apples - more food!). Other optional things to take with you if you find them: sugar canes (for books and brewing), mushrooms (brewing), cobble (furnace) and coal (torches plus smelting).
Keep an eye on your remaining PvP protection time (use /pvp time regularly).
Head to the spot you intend to build your base on. Be careful not to fall into ravines or other deep holes.
Build a miniature shelter from anything you collected on your way. Use the correct size (see below) and shape. If you did not collect enough dirt, wood, cooble or any other solid material, dig down (not straight down!) and close off the top.
Claiming
Once you’re there, you first have to create the faction and claim land, so everything you build is protected from other players. First do /f create {factionname} (substitute {factionname} with your preferred faction name). This will create the faction and put your player’s 100$ in-game money into the faction account. Your faction now owns 100$ which you can spend to claim land. To do so, craft a stick. With this stick, hit the two corners of the land you want to claim while not crouching. Since you only have 100$, you can only buy a small piece of land. There’s also a tutorial with more information on claiming.
The claiming cost can be calculated like this: The first 250 blocks cost 0.4$ each, then 0.8$ per block for the next 250 blocks, 1.2$ for the following 250 and so on. As you see, claiming gets more expensive the more land you want to claim. If you start a second claim, it costs 500$ plus the cost for the blocks. The third claim costs 1000$ and so on. More information on claiming costs is available on the forum. You can also use our claiming cost calculator:
Claiming your claim with a size of x will cost you 90$.
With your 100$, you can claim a 15x15 area. Do this now. Once you hit the second corner of your land with a stick, the game will tell you the claiming cost and ask you for the name of the claim. Just type the name into the chat. Use “base” for example.
Next, use the stick and left-click into the air (without hitting any block). You should see pillars made of glass. These show you the corners of your land. Use them to make sure you built your base within your claim. Left click with a stick into the air to get rid of them. If you don’t have a stick, you can also use /f map to toggle those pillars.
If you are playing as a group, now might be a good time to invite your friends into your faction.
Inside your claim, other players cannot build or break blocks. But they can interact with these blocks, so be careful when you use them:
- Wooden buttons. Other players can shoot them with arrows.
- Pressure plates. Other players/mobs can step on them.
You can unclaim land. If you do that, the block costs (that is all except the costs for starting the claim, e.g. 500$ for the second claim) will be refunded into the faction account. If you disband your faction, all the claiming costs and the faction bank will end up in the leaders private account.
Building your first base
Look at this exemplary side-view of your claim:
The red area is the area outside your claim; other players can place and remove blocks there. The glass pillars show the border of your claim. Unless you know what you’re doing, build your walls at least one block away from the border of your claim. This prevents other players from interacting with – for example – your doors! Never build any redstone sensitive block close to your walls. Look at this picture:
The red area is outside your claimed land. See the redstone wire 2 blocks inside your claim? It’s powered by the repeater and redstone torch any player could place outside your claim.
Always build redstone sensitive blocks at least 2 blocks away from the edge of your claim.
Here is another thing to avoid as it will get you killed. Be careful how much you dig out underground. Here’s a picture:
See the staircase going under ground? The small tunnel was build one block too far. Now the wall (in red on the picture) is outside your base! So any player can remove the dirt block that’s your wall. Once players see your base, some of them will dig down to search for these holes. Be careful! How to prevent this? Look at this picture:
Not sure if the wall next to you is safe? Do a wall check like this: Carefully check if enemy players are nearby. Then dig out the 4 blue blocks. Now walk into your small hole. When you enter the outer block - the position marked as 1 in the picture - you should see a message like this in your chat: “Exiting {your faction name}” “Entering Wilderness”. Now walk back to position 2. You should see another message: “Exiting Wilderness”, “Entering {your faction name}”. This means that position 2 is already inside your claimed land and your walls were safe. Put the blocks back inside the blue area and enjoy the safe base.
Hint: Turn on the debug screen (Press F3) to see the coordinates. Walk into two opposing safe corners and write down the coordinates. Check against those when digging.
Nether and build a portal at the coordinates for your base (x and z divided by 8). When they enter the portal, Minecraft checks if there already is a portal in the overworld. If no portal is nearby, it will create a new one. This portal might be created right inside your base!
Always build a Nether portal, even if you don’t intend to use it yet.
To prevent this, you have to build a Nether portal. Search for diamonds (best level for that is around y=11). Build a diamond pickaxe and mine obsidian. Then build a Nether portal inside your base in a room that can be closed (to prevent zombie pigmen and enemy players from entering your base). Be sure to leave empty an space of 2x3 air blocks on both sides of the portal. If you build anything there, it will be destroyed by the first player entering your side of the portal. This is a special portal behaviour on hcfactions that prevents players from building portals that trap other players. See the thread on the forum for more details.
If you don’t find diamonds, you can also create a portal using only buckets and lava/water..
[paste:font size="5"]Mining
HCF provides temporary player classes which enable special abilities. To activate classes on this server, you have to wear certain armor. The most useful class at the beginning is the Miner Class. It provides you with Haste II and Night vision. To activate the Miner Class, craft yourself a set of unenchanted iron armor and put it on. You should see a message in chat that says “Miner Class activated in 60s”. Wait 60 seconds and you’ll get the effects associated with the Miner Class. The Miner Class makes it easier to mine, since you don’t need torches and you break blocks slightly faster.
The Miner Class also enables Zuergner mining (named after the player that made this mining technique public): If you have an Efficiency 5 pickaxe, you’ll melt through stone like butter. But more on that later.
Be careful about mineshafts. The cavespiders that spawn there are very dangerous. The server is in Hard Mode, so they will poison you. Consider carrying a Milk Bucket with you, so you can remove the poison effect.
Getting back to spawn and making money
Once you mined enough ores, it’s time to sell them at the spawn. It’s called a Spawn Run. You have to walk back to spawn. The spawn is always at x=0, z=0. There are several ways to get there, although only the first one is available for beginning factions:
Overworld
Walk to x=0, z=0. Be sure to take enough food with you, so you don’t starve on your way to spawn. Don’t forget the items you want to sell. Only leave at daytime, otherwise you’ll have to fight with mobs. If you have good armor at this point, you can also leave at night, since this provides some protection from enemy players. Be careful not to walk right by major factions. Don’t walk too close to the event areas (King of the Hill and Palace) if an event is currently running (use /koth time to find out). Have some tools and blocks with you so you can dig if necessary. Once you’re near spawn, run in. If other players attack you, don’t fight back, as this will “combat tag” you and will prevent you from entering spawn for 60 seconds (Note that a thorns armor will count as fighting back, so don’t wear one when doing spawn runs).
If you already have a brewing stand, consider using Invisibility. To be fully invisible, you cannot wear any armor or have any item selected. While players should not be able to see you (except for some barely visible particles), be even more careful about hostile mobs!
Nether
You can also reach the spawn using the Nether. The distance is divided by 8, so the walking distance is a lot smaller, but probably more dangerous. Be careful about Zombie Pigmen. It is possible that other players made them aggro and they attack you. This happens a lot, so watch out!
The Exit portal in the Nether (that leads right into spawn) is located somewhere around x=0, z=0 in the Nether. There’s also a safe zone around the exit portal, where mobs and other players cannot hurt you. Be sure to bring enough building blocks with you so you can build bridges or stairs if necessary. Gravel is very helpful when descending into deep pits. Also bring some extra tools with you, as you might have to dig a lot.
The End
If you live near an End portal (or even have your own (more on that later)), you can use the End. It’s the quickest way back to spawn.
Don’t go into the end without proper armor. Players might camp there waiting for you.
Selling and transferring money
At spawn, there’s the Spawn Shop somewhere. There are signs on the wall which you can hit with the left mouse button. This will sell the ores in your inventory and put the money in your personal account. Use /econ to check how much money you have. You should never walk around with money in your pocket, a player which kills you gets your money. And it’s lost when you die to mobs.
Always transfer money you have on you to your faction bank account. Check /econ to see the amount of money you have, then do /f m d {amount} to transfer it to the faction. Use /f show to see the faction balance.
Always transfer money to your faction. Otherwise it’s lost when you die to players or mobs.
Once you sold your ores, it’s time to get back home. Use /f home for that. You’ll be back at your base (remember that costs 50$).
Prices for selling
single stack stack of blocks
Redstone $1 $64 $576
Lapis Lazuli $2 $128 $1152
Emerald $5 $320 $2880
Iron $5 $320 $2880
Gold $10 $640 $5760
Diamond $50 $3200 $28800
Sponge $1000 $64000
Prices for purchasing
Some of the items might not be available yet. Ask in chat before you go to spawn to buy them.
16 Stone Slabs $50
16 Moss Stone $50
16 Cracked Stone $50
16 Circle Stone $50
16 Moss Cobble $50
16 End Stones $100
Chain Armor $400
Mycelium $500
Book and Quill $10
Redstone Lamp $10
Slimeball $25
Villager Egg $500
Blaze Rod $750
Netherwart $1500
End Portal Piece (you need 12 for a full portal) $15000
Crowbar1 $50000
Source: 1, 2, 3, 4, 5, 6, 7
Custom Item Recipes
There are 3 custom crafting recipes you can use:
Expanding your base
To be done…
Efficiency 5 mining
If you have an enchantment table, work towards getting a Efficiency 5, Unbreaking 3 pickaxe. The easiest way is to combine a Efficiency 4, Unbreaking 3 pickaxe with another Efficiency 4 pickaxe on an anvil. Be sure to rename your pickaxe, otherwise repairing it will cost 2 additional levels each time up to the the point where it’s no longer possible.
With your new pickaxe, use the Miner Class, go down to y=11 and start mining like crazy. Strip mining will be boring after you’ve tried this once
See this video for more information on this technique. Be sure to also enchant a Fortune 3 pickaxe, so you can get more experience and ores while mining. It’s up to you if you carry a Silk Touch pickaxe with you (and use the Fortune pickaxe at home) or use the Fortune pickaxe while mining.
Use the Minecraft Enchantment Calculator to find the best level to enchant your items.
Moving a spawner
You can buy a crowbar for ????$ at the Spawn Shop. It will allow you to pick up a spawner once. Use it wisely.
Do NOT use the crowbar to farm. It will decrease its durability making it impossible to pick up spawners!
You should always have one spawner to grind XP you can then spend on books or other enchantments.
Enchanting and XP
The server removes some enchantments available in vanilla minecraft and caps others to certain levels (see details on hcfactions.net). This creates a more balanced PvP. There is also an XP modifier active, so you get 3x the amount of XP for everything you do.
Unlike vanilla minecraft, you can remove the enchantment from books by hitting an Enchantment Table repeatedly. So don’t collect your Bane of Arthropods books
You can save levels in bottles of enchantments by clicking on a enchantment table with an empty bottle. Use it to store experience that you cannot use now or might use in the future in times when mob spawning or other sources of xp are disabled - for example during Palace or EOTW.
Placing an end portal
If you have 12 end portal pieces, place them while standing in the middle. Also put in the eye of ender from a position that’s located towards the center of the portal. If you fail to do this, your portal might not light up. Contact the admins if that happens.
Protecting against cheaters
Try to build walls 2 blocks wide. This might help against players that try to v-clip/h-clip into the base. Piston doors might help also because iron/wood doors can be easily clipped through. Sadly this happened a lot in recent maps. So if your near spawn, be prepared to face cheaters.
So don’t afk inside the base. You might not be as safe as you think you are. Contact the admins (Use the modmail link in the right bar on the subreddit) if cheating happens.
Betraying
Don’t do it. Seriously. It’s probably not worth it. You reputation will suffer. All players will remember that you betrayed and you’ll most likely never get a spot in any good faction again.
Fighting
Click and jump the other player until one of you dies. Good luck.
Well. Not really. There’s a lot more to it. Since this tutorial was written by fluffy, a peaceful faction, this is everything we can say about fighting technique. Be sure to check out videos on youtube and follow the [subreddit][subreddit], where players sometimes provide insights on how to fight.
Don’t even try to fight diamond players without proper equipment. You’ll die in 5 seconds. Run and hide!
Classes
See the description on the website for more information on classes. Here is a small summary:
Archer
The archer class is activated by using leather armor. It enables speed and also modifies that damage done by arrow hits. The damage is multiplied depending on the distance of the target. A hit from 50 blocks will deal five times the damage. The vertical distance is not relevant. Only the horizontal distance is used for the damage calculation.
Rogue
Rouge is activated by using chain armor (you can get these from skeleton spawners or maybe at Spawn). Rouge can use golden swords to try to backstab diamond players. These backstabs will deal great damage. Rouge also gets a high speed buff, which might make it easier do to spawn runs, since it can outrun other players.
Bard
A set of golden armor enables the bard class. The bard is a support class that can provided buffs to near players of the faction.
Combat Tagging
If you attack other players, you’ll be combat tagged. This prevents you from entering safe zones for 60 seconds.
Combat Logging
You cannot escape fights by closing your Minecraft client. Disconnecting from the server while close to an enemy player will create a combat logger for 30 (???) seconds. A combat logger looks like a pigman with the player’s name. If you kill the logger, the player dies.
Be careful. There’s an unresolved bug in the combat logger code: If two players (maybe of the same faction?) combat log at the same time, the combat loggers attack each other.
Enderpearls
Enderpearls have a cooldown time of 15 seconds. So you have to wait between consecutive usage.
Dying
If you die, several things happen:
- You faction loses power. If your power falls below 0, your faction will become raidable.
- The player that killed you gets the money you had on you (/econ).
- You are death-banned for the amount of time you’ve played on the current map. So if you played for 12 hours, you’ll get banned for 12 hours. If you’ve played more than 3 days, your deathban is capped at 3 days.
- The maximum power of your faction is lowered by 10 for the time you are death-banned.
- You are very likely to lose all your possessions.
Getting back
If you respawn (either by buying XP and converting them to lifes, getting donated a life or waiting till the deathban expired), you’ll be in the safe zone of the dimension you’ve died in.
Subclaims
See our Permissions Tutorial.
Permissions
See our Permissions Tutorial.
Events (King of the Hill, Palace, etc.)
Check out this (old) article.
KOTH
Basically stand in a certain area (cap zone) at a certain location for 20 minutes to win the KOTH (King of the Hill). While KOTH is running the area around the capzone has a reduced deathban of 15 minutes. So it’s not too dangerous to die there. Be aware that when you win KOTH deathban returns to the full scaling deathban an you might be banned up to three days if you die.
Mini KOTH
Basically like KOTH but with reduced loot. They don’t have a fixed location and spawn randomly (outside of faction claims) on the map. The location is announced in chat.
Evil Tower
You enter a tower and have to fight your way against mobs (and potentially other players) through 13 floors. At the top of the tower are loot chests and an end portal exit. Do /f who EvilTower to find out where Evil Tower is on the current map (if at all).
Mob damage multiplied, so mobs do a lot of damage. It’s recommended to go as a (small) team. Team size should be below DTR of course. Don’t become raidable doing Evil Tower!
Evil Mine
PvE Zone where you can fetch loot from chests.
EGG
Extreme Grass Growing is a minigame which is available as spawn from time to time. 16 Players in a glass cube wait for grass to grow to their spot. The winner gets items (some unobtainable by other means, like admin heads). The entrance is in the water below the east bridge inside Spawn. Remember to not wear leggings while playing EGG
End of the World (EOTW)
The last big fight before the map ends. There’s a capzone at spawn that has to be captured for 30 minutes.
Random Tricks
- /f invite v shows who is invited
- /bb time shows your play time. it’s also visible if you look into your statistics in the Minecraft menu.
Last edited: